
James - comments on the photos side:
Most of the photos could do with the exposure being raised. Slight underexposure, but nothing to worry about.
The riders are too small in frame. Which can be fine, but in a lot they are small in frame with the road obscuring their direction of travel as it often rises away blocking them from making an impact. Tighter crop on this one and it'd be quite good - https://flic.kr/p/YNEyGW
This photo - https://flic.kr/p/YsC5mQ had you been low to the ground, would have been excellent with the rider silhouetted to the road and arch. Frame within the frame, old and beautiful when done correctly.
This https://flic.kr/p/YRgNeT standing on the other side of the road, filling the LHS of the frame with black and alternating blown out highlights in the window....would be stunning to my taste.
This in B&W .... would be good https://flic.kr/p/YNDpcf
EDIT - also, as others have said - practice and get things wrong.
Sort of a photo thread - the basics and getting better tips
Moderators: Bearbonesnorm, Taylor, Chew
Re: Sort of a photo thread - the basics and getting better t
One of the things I'd recommend is to do is a 365 project.
For the next year take one photo everyday.
It'll open you up to different views depending on what your day brings, make you speak out different things to stop you repeating yourself and you'll see the progression through the year.
Yes, some will be rubbish as you won't be in the mood and it's of your dinner, but you'll find you get a couple of good ones a month.
Re: Sort of a photo thread - the basics and getting better t
- it really is JackT, thanks. Both the quotes from others and the insight into process.hope it's helpful.
Greg, that's really helpful stuff too. I suspect I'm a bit less critical than you and others / I know what I'd be happy with and that's probably OK given my aims ... but as SteveM said, get the basics practiced and follow good tips on the basics (the edit process you and Jack describe is great to know about, thanks for sharing) and I'm sure better things will follow. I know what you mean about seeing photos around you. I follow a few photographers on instagram that seem to be changing how I see things, or they express something that I see from time to time but wouldn't know how to capture. And noted about posting from the phone, my RX100 does that but I wasn't that interested to actually do so during the ride .. tech faff tolerance limit is low and social media similarly low on priorities while riding : )
On the individial pic comments, agreed .. this is useful to read as I'm sure I'll see similar places again and will remember better ways to try a shot (on the tunnel pic, I think I did better last year in the same place? https://www.flickr.com/photos/67338272@ ... 727522304/)
I suprised someone a few weeks back by saying I was more excited about a having a new camera than the new bike for the TNR. I know what I can do on a bike mostly and I know what a bike does .. cameras feel like a whole new thing entirely. Thanks everyone for all the comments and tips so far.
-
danielgroves

- Posts: 395
- Joined: Sun Mar 02, 2014 9:55 pm
- Location: Bath/Bristol, UK
- Contact:
Re: Sort of a photo thread - the basics and getting better t
That's a nice shot.jameso wrote:On the individial pic comments, agreed .. this is useful to read as I'm sure I'll see similar places again and will remember better ways to try a shot (on the tunnel pic, I think I did better last year in the same place? https://www.flickr.com/photos/67338272@ ... 727522304/)
I'd probably have let the cyclist get a little further way, and dropped a bit to give a bigger sense of scale.
Also, you want to pull the highlights back a tad on that one, lots of details look blown-out (over exposed) out of the end of the tunnel.
Adventures and Photography Blog: danielgroves.net/adventures-photography
Twitter: @danielsgroves
Instagram: @danielsgroves
Photography on Facebook: facebook.com/danielgrovesphotography
Photography on Instagram: @danielgrovesphotography
Twitter: @danielsgroves
Instagram: @danielsgroves
Photography on Facebook: facebook.com/danielgrovesphotography
Photography on Instagram: @danielgrovesphotography

Re: Sort of a photo thread - the basics and getting better t
Good thread this
I nearly always use my iphone (6), as it's always in my pocket and is easy to grab pictures with. Particularly of the kids, as they're often impromptu so having a camera in my pocket to grab those moments is great.
I also find it a bit of a hassle to remember to take a camera with me (my compact is an aged Panasonic LX2), and I find reviewing pictures on my phone a nice way to bring back memories
However, the photos are rarely good. I have an aged dSLR (Nikon D40) with a few lenses, including a nice prime, but I haven't used it in ages as I find its size a bit big for day to day use. I was planning to take it to Lapland with me this Christmas but keeping it in a bag and protected from the cold will be a pain (more protected means harder to access).
I also like the idea of having a better camera with me for bikepacking, I like the notion of a waterproof camera, as most of my trips are wet, but I know that the end product is compromised.
RX100 really is very well reviewed isn't it
I'm not sure I can be bothered to do much PP work, and my laptop definitely isn't powerful enough to be able to cope with it. Although on a more powerful machine I suppose I could sit in front of the TV and do it. Hmmm
Re: Sort of a photo thread - the basics and getting better t
with all due respect to Ben, that list of reasons to not do something is what makes the difference, can't imagine Dan thinking like that, if you can't be bothered then your expectations of getting good photographs are unrealistic
Re: Sort of a photo thread - the basics and getting better t
I'd like to have my cake and to eat it please, in a small, dense, tasty and low calorie formatSteveM wrote:with all due respect to Ben, that list of reasons to not do something is what makes the difference, can't imagine Dan thinking like that, if you can't be bothered then your expectations of getting good photographs are unrealistic
-
ScotRoutes
- Posts: 8144
- Joined: Mon Mar 18, 2013 9:56 am
Re: Sort of a photo thread - the basics and getting better t
Why?
For Ben I guess. Why do you want "better" photos and what do you think is missing in those you have?
I think it's great to have a few really good ones as decoration, as art, as a display of "talent". Mostly though, my photos are a reminder of time and place. Like your iPhone photos of the kids, these are often the ones you'll look back on rather than some posed masterpiece that often bears no resemblance to the reality.
Even looking through ride reports on here, I'm mostly attracted to the very natural looking stuff and there are some (sorry Dan) I skip over as being too artificial. On the other hand, I'm not trying to make money as a photographer so my knowledge of what sells is non-existent.
Of course it's possible to get better, to more clearly capture what you see at the time, or to emphasise certain parts of that. I'm sure most of us are trying to do that.
Re: Sort of a photo thread - the basics and getting better t
Good challenge back
I like the poster art type pictures, I don't want all my pics to be like that, but the odd one would be nice. For a special trip a memento like that would be great
We rarely print pictures, and very rarely get anything big done, there are a couple of canvases we've had done though. Those pics are all mine, nothing particularly special, but all conjure up a memory of that time. Particularly the ones of family, they're great. I often end up taking loads of pictures as trying to get a 5 and 6 year old to pose at the right time is.. um... tricky. So I take loads and delete the ones where they are pulling funny faces, looking the wrong way, having a strop etc
Now I think about it, the ones that look special and as wall art tend to cover something I like - mountains, scale, scenery. I'd like those to be of my trip though. Having a camera to cover that would be great
The family ones always make me smile, they're pics of my family which are always special. Having a camera to cover that would also be great, but the balancing act for this is actually having a camera on hand to capture that moment. Where a proper camera helps is in the actual quality of the photo being better - example here is my dSLR will capture more light so be better in darker conditions, and if I use a flash I can bounce it off the ceiling to make it look more natural. That's never going to happen with my phone, but I always have my phone with me (lives in my pocket unless I'm in bed!)
Re: Sort of a photo thread - the basics and getting better t
So my copy of Understanding Exposure arrived and I've read the basics, will digest more over the next week or two. What's clear is I was clueless : ) The idea of ISO, aperture and shutter speed makes sense now, a bit like getting a bike fit and geometry to work if there's three variables, one takes priority and affects the other/s.
Anyway, the book talks about 'adjusting shutter speed so the light meter shows the correct exposure in the viewfinder'. I'm not sure what the light meter is, but I found this scale in the settings -
An over-exposed setting with a spike on the right =

and I see on the right of the scale (a scale that I think I recognise from the Photoshop levels tool, or looks similar) that as I adjust the shutter speed to let less light in the brightness drops as does the bias/spike on the right. A darker setting =

I know I can just see how it looks as I adjust it in the viewfinder or screen before taking a shot, but is this what is meant by the light meter and is this useful to prevent the 'blown out' elements? (appreciate that light and dark in woodland seems hard to balance up, just took these 2 shots to illustrate)
Anyway, the book talks about 'adjusting shutter speed so the light meter shows the correct exposure in the viewfinder'. I'm not sure what the light meter is, but I found this scale in the settings -
An over-exposed setting with a spike on the right =
and I see on the right of the scale (a scale that I think I recognise from the Photoshop levels tool, or looks similar) that as I adjust the shutter speed to let less light in the brightness drops as does the bias/spike on the right. A darker setting =
I know I can just see how it looks as I adjust it in the viewfinder or screen before taking a shot, but is this what is meant by the light meter and is this useful to prevent the 'blown out' elements? (appreciate that light and dark in woodland seems hard to balance up, just took these 2 shots to illustrate)
-
voodoo_simon

- Posts: 4355
- Joined: Fri Apr 26, 2013 9:05 pm
Re: Sort of a photo thread - the basics and getting better t
The keen photographers will shrivel up and die with this comment but for me
Aperture - use this as a priority for landscape related photos
Shutter - use this as a priority for action related photos.
Once happy with both, then full manual but it's rare that I'll use it this - except for some awkward landscape scene (waterfalls etc) or sport scenes (almost night shots etc).
In terms of the graph on your camera, I was under the impression that the flatter/smother the graph, the better (i.e less spikes)
-
whitestone

- Posts: 8248
- Joined: Thu Dec 04, 2014 10:20 am
- Location: Skipton(ish)
- Contact:
Re: Sort of a photo thread - the basics and getting better t
The "scale" is a histogram of the brightness levels in the shot that is being displayed so a dark shot will have a spike or bump at the left side and a bright shot will have the bump at the right. A shot of a chess board would have a histogram like:
|_____|
As everything is either pure black or pure white.
The light meter is the electronics that helps work out the correct exposure, on older cameras like the Olympus OM1 it was a needle that you aligned between two arrows.
I tend to think of ISO as sensitivity/diameter, aperture as flow control and shutter speed as time. As an analogy if you had a pipe then increasing ISO increases the diameter; altering the aperture allows less or more water through and time is how long you let water flow for. So you can have a bigger pipe with a smaller aperture or a smaller pipe with a bigger aperture and if you let water flow for the same time then you'll get the same amount of water (exposure).
Obviously in terms of photography, shutter speed and aperture have other effects like blurring motion or increasing depth of field.
Better weight than wisdom, a traveller cannot carry
Re: Sort of a photo thread - the basics and getting better t
Good explanation..A shot of a chess board would have a histogram like:
|_____|
As everything is either pure black or pure white.
Thanks, so the display I was looking at doesn't really do any more than judging how it looks on screen/in the viewfinder, apart from checking overall levels. Any Sony owners know where to find this light meter tool on the RX100? There is a scale in the viewfinder, lower edge, +3 to -3, but no setting changes seem to affect it / not sure exactly what that scale is.The light meter is the electronics that helps work out the correct exposure, on older cameras like the Olympus OM1 it was a needle that you aligned between two arrows
-
JohnClimber
- Posts: 4117
- Joined: Fri Feb 17, 2012 10:41 pm
- Contact:
Re: Sort of a photo thread - the basics and getting better t
There is no way I can add anything to any of the above comments from much better photographers than I.
The only thing I can add is to practice, practice and practice.
I take at least 1 (different) photo every day..... you are then forced to look for different shots and angles even if it's of the same thing.
There are several 365 groups that I can point you in the direction of if you are interested. Whether it's a short on time unedited camera phone shot to a full on favourite (of mine) wall mounted photo, it doesn't matter it's just about the composition and the practice.
I've been doing 365 since 2009 (missed a couple of months) and feel that I have improved as time has gone on.
https://www.perfectpackrafts.com
and
Use discount code Johnc20 to get 20% off Crofto Cycling Clothing
Website - https://crofto.com.au/
and
Use discount code Johnc20 to get 20% off Crofto Cycling Clothing
Website - https://crofto.com.au/
Re: Sort of a photo thread - the basics and getting better t
Jameso.
The light meter on your RX100 effects the histogram - effectively it is a distribution curve for the light intensity, LHS blacks, grey midtones, RHS bright white. Ideally the photo will be exposed to give a bell curve in the histogram. The actual metering of the photo however is taken in one of a few ways.
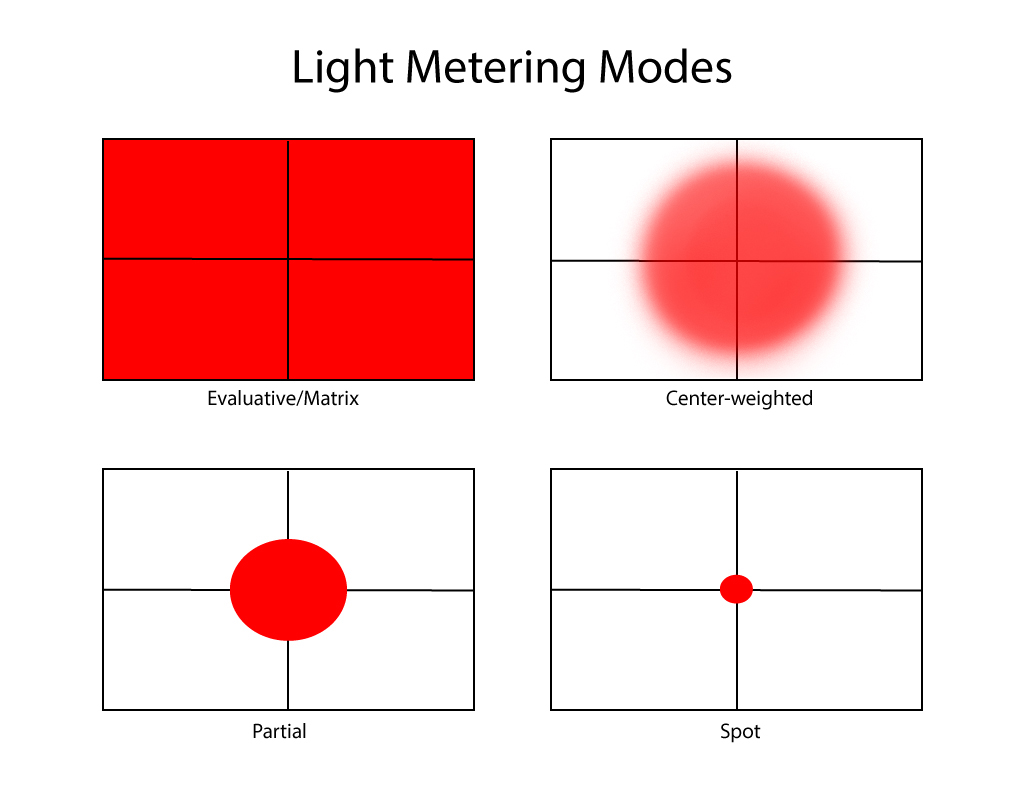
Spot metering - you point the middle box in your viewfinder at a location in the screen, half depress the shutter release, it'll meter that spot then expose the frame based on that even if you reposition the camera. Assuming you don't release the shutter.
Patrial - average of a wider area as with spot, often you can move where this area is in the frame.
Centre metering - it'll do the same as spot, but with a wider area across the middle of the frame.
Matrix metering - what most cameras are set to out of the box. it aims to look at the frame you've presented, then balances the exposure to give a bell shaped histogram.
Personally, I set my camera to spot metering, point it at what I want to have as both the focus and meter point (often, but not always the same thing) then I compose the shot after that. Example as shown -
 L1020229-Edit.jpg by Greg.May, on Flickr
Photo was metered on the zip toggle of my wifes jacket. Window details (highlights) behind the veil are gone, there is no data there, just 100% white, similar in the shaddows, LOTS of data, but too much to resolve. What I wanded was the midtones about her face and the rippling light.
If I'd not, the shot would have been a grey mess with the camera trying to sort out data all over the place.
Meter. Focus. Recompose.
The light meter on your RX100 effects the histogram - effectively it is a distribution curve for the light intensity, LHS blacks, grey midtones, RHS bright white. Ideally the photo will be exposed to give a bell curve in the histogram. The actual metering of the photo however is taken in one of a few ways.
Spot metering - you point the middle box in your viewfinder at a location in the screen, half depress the shutter release, it'll meter that spot then expose the frame based on that even if you reposition the camera. Assuming you don't release the shutter.
Patrial - average of a wider area as with spot, often you can move where this area is in the frame.
Centre metering - it'll do the same as spot, but with a wider area across the middle of the frame.
Matrix metering - what most cameras are set to out of the box. it aims to look at the frame you've presented, then balances the exposure to give a bell shaped histogram.
Personally, I set my camera to spot metering, point it at what I want to have as both the focus and meter point (often, but not always the same thing) then I compose the shot after that. Example as shown -
L1020229-Edit.jpg by Greg.May, on FlickrPhoto was metered on the zip toggle of my wifes jacket. Window details (highlights) behind the veil are gone, there is no data there, just 100% white, similar in the shaddows, LOTS of data, but too much to resolve. What I wanded was the midtones about her face and the rippling light.
If I'd not, the shot would have been a grey mess with the camera trying to sort out data all over the place.
Meter. Focus. Recompose.

Re: Sort of a photo thread - the basics and getting better t
So the one crap thing about Sony cameras....the menu systems are awful.jameso wrote: Thanks, so the display I was looking at doesn't really do any more than judging how it looks on screen/in the viewfinder, apart from checking overall levels. Any Sony owners know where to find this light meter tool on the RX100? There is a scale in the viewfinder, lower edge, +3 to -3, but no setting changes seem to affect it / not sure exactly what that scale is.
Top of my head it is MENU -> section 2 or 3 [Metering Mode] -> pick your desired mode
EDIT - that was for the Mk1, not sure on later editions, but probaby the same. I also think you can set a Fn (function) to do this quickly??
Re: Sort of a photo thread - the basics and getting better t
Really helpful, thanks Greg. Without knowing what all this meant before this is basically what I was doing with my old Coolpix camera - setting the viewfinder on an area, half-press, move or recompose then shoot - got some good low light landscapes that way. Didn't realise it was an intended method and have seen the metering settings on this camera, spot / centre etc. Makes more sense now, cheers.GregMay wrote:Jameso.
The light meter on your RX100 effects the histogram - effectively it is a distribution curve for the light intensity, LHS blacks, grey midtones, RHS bright white. Ideally the photo will be exposed to give a bell curve in the histogram. The actual metering of the photo however is taken in one of a few ways.
-snipped-
Spot metering - you point the middle box in your viewfinder at a location in the screen, half depress the shutter release, it'll meter that spot then expose the frame based on that even if you reposition the camera. Assuming you don't release the shutter.
Patrial - average of a wider area as with spot, often you can move where this area is in the frame.
Centre metering - it'll do the same as spot, but with a wider area across the middle of the frame.
Matrix metering - what most cameras are set to out of the box. it aims to look at the frame you've presented, then balances the exposure to give a bell shaped histogram.
/
Meter. Focus. Recompose.
Edit .. so Spot/other Metering use with or without Aperture Priority setting gives automatic shutter speed selection - I think. Anyway, will play about with it all this eve knowing more about this ^
Last edited by jameso on Mon Oct 02, 2017 2:07 pm, edited 1 time in total.
Re: Sort of a photo thread - the basics and getting better t
@johnclimber, it's a good idea, I'm not good at 'daily habits' but it got me thinking as I rode my usual first few miles of the morning loop, passing that same view I really like for the many-hundredth time - what I'm going to do is take the camera when I have 2 nights a week away for work and also on the bike more often, esp. when doing slower or recovery ride bimbles. Hoping to get a few 'classic' local composition shots perfected over time, adapting to different light etc, just experimenting and looking at the settings, as well as seeing what comes from an area that's got good abstract options at useful times of the day. Practic and familiarity...
Will need to add 2 days to my schedule for next TNR at this rate!
Will need to add 2 days to my schedule for next TNR at this rate!
-
Bearbonesnorm

- Posts: 24200
- Joined: Sun Jun 05, 2011 8:53 pm
- Location: my own little world
Re: Sort of a photo thread - the basics and getting better t
Very interesting post - I was out this morning on a final BB200 recce' ride and when I stopped to take the odd piccy, I was much more aware of what I was doing. Pictures are probably still crap but maybe a bit more interesting 
May the bridges you burn light your way
Re: Sort of a photo thread - the basics and getting better t
Yeah, this is what is effectively called "program" mode on most SLR or bridge cameras. They also tend to tweak the ISO setting for best effort.jameso wrote: Edit .. so Spot/other Metering use with or without Aperture Priority setting gives automatic shutter speed selection - I think. Anyway, will play about with it all this eve knowing more about this ^
Meter where you want, then it figures out the rest.
-
Dave Barter

- Posts: 3830
- Joined: Sun Jun 16, 2013 6:21 pm
Re: Sort of a photo thread - the basics and getting better t
While I have the attention of the photo geeks. I am in the market for a new rugged camera as my Canon D30 is in a sorry state.
Any opinions on the Olympus Tough TG-5 which looks to be the sort of think I'm after?
Any opinions on the Olympus Tough TG-5 which looks to be the sort of think I'm after?
Elite keyboard warrior, DNF'er, Swearer
Re: Sort of a photo thread - the basics and getting better t
Great thread - thanks for starting it.
If so, it shows you the difference between the exposure that your manual settings would give, compared to the exposure that the camera would set. I guess that it will only be active in fully manual mode, and is the nearest thing that you'll have to a traditional light meter (adjust your settings to get the marker to the '0' reading if you want to match the metered exposure).
It's probably calibrated in "stops" - i.e. steps in either aperture or shutter speed settings. (Without going into detail, the seemingly random adjustment steps in shutter speed or aperture that you get when turning the dial have been chosen to give even steps in exposure: "stops").
*EDIT* It could be EV, rather than stops, but in principle, it's the same (AFAIK).
My photos aren't great, but have improved by changing from just using full auto (program mode?) all the time to using aperture priority most of the time - think about whether the photo would benefit from a deep depth of field - for example to keep both foreground and background in focus (= small aperture = high 'F' number) or a shallow DoF - for example to isolate the subject from the foreground or background ( =large aperture = low 'F' number) or just leave it somewhere in the middle (apologies to purists!). The other thing I have found very useful is to try cropping and re-centring photos that haven't quite worked. I have a tendency to try and fit everything in a picture where I would take more interesting pictures if I decided on a subject and framed the shot accordingly. The RX100 images are of sufficient resolution that they can stand quite a bit of cropping and still be respectable, but even if not, I find it a useful exercise.
You can assign various functions to the "focus" ring of the RX100 which reduces the need to navigate the menus. (e.g exposure compensation, ISO, etc.)
I'm sure that Lord Snowdon was once asked how he manage to put together a collection of such great photographs, to which he replied along the lines of "It's quite straightforward: You take a lot of photographs and throw the bad ones away".
I can't add much: I've got the MkI, which is slightly different, but I think the +3/-3 scale is the "Metered Manual" (Is it marked with an [M.M.] icon?)Any Sony owners know where to find this light meter tool on the RX100? There is a scale in the viewfinder, lower edge, +3 to -3, but no setting changes seem to affect it / not sure exactly what that scale is.
If so, it shows you the difference between the exposure that your manual settings would give, compared to the exposure that the camera would set. I guess that it will only be active in fully manual mode, and is the nearest thing that you'll have to a traditional light meter (adjust your settings to get the marker to the '0' reading if you want to match the metered exposure).
It's probably calibrated in "stops" - i.e. steps in either aperture or shutter speed settings. (Without going into detail, the seemingly random adjustment steps in shutter speed or aperture that you get when turning the dial have been chosen to give even steps in exposure: "stops").
*EDIT* It could be EV, rather than stops, but in principle, it's the same (AFAIK).
My photos aren't great, but have improved by changing from just using full auto (program mode?) all the time to using aperture priority most of the time - think about whether the photo would benefit from a deep depth of field - for example to keep both foreground and background in focus (= small aperture = high 'F' number) or a shallow DoF - for example to isolate the subject from the foreground or background ( =large aperture = low 'F' number) or just leave it somewhere in the middle (apologies to purists!). The other thing I have found very useful is to try cropping and re-centring photos that haven't quite worked. I have a tendency to try and fit everything in a picture where I would take more interesting pictures if I decided on a subject and framed the shot accordingly. The RX100 images are of sufficient resolution that they can stand quite a bit of cropping and still be respectable, but even if not, I find it a useful exercise.
You can assign various functions to the "focus" ring of the RX100 which reduces the need to navigate the menus. (e.g exposure compensation, ISO, etc.)
I'm sure that Lord Snowdon was once asked how he manage to put together a collection of such great photographs, to which he replied along the lines of "It's quite straightforward: You take a lot of photographs and throw the bad ones away".
-
JohnClimber
- Posts: 4117
- Joined: Fri Feb 17, 2012 10:41 pm
- Contact:
Re: Sort of a photo thread - the basics and getting better t
If you are interested here are my photo a year collections.jameso wrote:@johnclimber, it's a good idea,
Nice to look back on, remember only 2 or 3 a year are any good, the rest act like a diary or weather watcher
2009
https://flic.kr/s/aHsj7Earhd
2010
https://flic.kr/s/aHsjp6osRa
2013
https://flic.kr/s/aHsjDrcvqk
2015
https://www.flickr.com/gp/25655510@N02/8757h6
2016
https://www.flickr.com/gp/25655510@N02/F160SS
and 2017 so far (even today's photo was boring)
https://www.flickr.com/gp/25655510@N02/C55h19
For some reason I didn't file the missed years that well, only 2012 wasn't complete
Once you get past your 5th month of photo a day it's hard to give up
Let me know what you think
John
https://www.perfectpackrafts.com
and
Use discount code Johnc20 to get 20% off Crofto Cycling Clothing
Website - https://crofto.com.au/
and
Use discount code Johnc20 to get 20% off Crofto Cycling Clothing
Website - https://crofto.com.au/
-
danielgroves
- Posts: 395
- Joined: Sun Mar 02, 2014 9:55 pm
- Location: Bath/Bristol, UK
- Contact:
Re: Sort of a photo thread - the basics and getting better t
This is quite a good guide to help understanding of aperture, iso and shutter speed, aka the "exposure triangle", for those who struggle the visualise things more.Misterg wrote:My photos aren't great, but have improved by changing from just using full auto (program mode?) all the time to using aperture priority most of the time - think about whether the photo would benefit from a deep depth of field - for example to keep both foreground and background in focus (= small aperture = high 'F' number) or a shallow DoF - for example to isolate the subject from the foreground or background ( =large aperture = low 'F' number) or just leave it somewhere in the middle (apologies to purists!). The other thing I have found very useful is to try cropping and re-centring photos that haven't quite worked. I have a tendency to try and fit everything in a picture where I would take more interesting pictures if I decided on a subject and framed the shot accordingly. The RX100 images are of sufficient resolution that they can stand quite a bit of cropping and still be respectable, but even if not, I find it a useful exercise.

It's worth noting though, lenses have a "sweet spot" where they're sharpest at a certain aperture. This generally sits around f/8 but not always. As you dial the aperture either way you'll loose some detail, and sometime control other effects which may or may not be desired such as sunburst (better sunbursts at a higher f-stop, more mushy ones at a lower f-stop).
Last edited by danielgroves on Tue Oct 03, 2017 11:52 am, edited 1 time in total.
Adventures and Photography Blog: danielgroves.net/adventures-photography
Twitter: @danielsgroves
Instagram: @danielsgroves
Photography on Facebook: facebook.com/danielgrovesphotography
Photography on Instagram: @danielgrovesphotography
Twitter: @danielsgroves
Instagram: @danielsgroves
Photography on Facebook: facebook.com/danielgrovesphotography
Photography on Instagram: @danielgrovesphotography
-
danielgroves
- Posts: 395
- Joined: Sun Mar 02, 2014 9:55 pm
- Location: Bath/Bristol, UK
- Contact:
Re: Sort of a photo thread - the basics and getting better t
Interesting, you differ to me here then.GregMay wrote: Personally, I set my camera to spot metering, point it at what I want to have as both the focus and meter point (often, but not always the same thing) then I compose the shot after that. Example as shown -
...
Meter. Focus. Recompose.
I tend to meter off the whole frame and then use the exposure compensation dial (a very natural action on the Fuji X-T1 I mostly shoot) to make the adjustments I need. I focus and then readjust in the same as as you though unless I'm shooting landscape where I'll generally manually focus.
Adventures and Photography Blog: danielgroves.net/adventures-photography
Twitter: @danielsgroves
Instagram: @danielsgroves
Photography on Facebook: facebook.com/danielgrovesphotography
Photography on Instagram: @danielgrovesphotography
Twitter: @danielsgroves
Instagram: @danielsgroves
Photography on Facebook: facebook.com/danielgrovesphotography
Photography on Instagram: @danielgrovesphotography