Single Speed Conversion

Make your own gear? Talk about it here!

Moderators: Bearbonesnorm, Taylor, Chew

Post Reply
User avatar
sean_iow
Posts: 4291
Joined: Tue Sep 30, 2014 12:08 pm
Location: Isle of Wight

Single Speed Conversion

Post by sean_iow »

Thought some of you might be interested in the conversion of my geared frame to singlespeed. I'm usually a singlespeeder but when I bought the Genesis frame I'd been riding a geared bike for a few months and thought that it would be ok to not have an ebb or sliding dropouts. It didn't take long to realise that I missed the simple life and so converted the bike to singlespeed. At first I thought I was lucky as it seemed to work with a magic ratio using the sprocket, chainring and chain from my other singlespeed. As the chain wore I decided to fit a new one and then discovered that the magic ratio only worked as the chain was part-worn when fitted and a new chain was too tight. I fitted a bb mounted tensioner and this was ok but the wheel only had an outer bearing and once muddy and wet the chain would slide over it rather than spin the wheel. I tried a rear tensioner but the shrouded dropouts limited the range of movement. I also had the my first puncture in years that the tubeless sealant didn't seal and removing the wheel was a pain as I had to unbolt the tensioner. I decided that a proper conversion was required. I considered using an ebb in my threaded shell but these have limited movement and I would no longer be using my preferred Hope BB. I thought about replacing the BB shell myself but then thought this might be a bit risky if it went wrong. I tracked down a frame builder who said they could fit sliding dropouts so I sent the frame off to them but 17 weeks later it returned with a note to say he couldn't get dropouts to match the angles of my stays :cry:

I then decided to revert to fitting a new BB shell myself, what's the worst that could go wrong? I bought the shell from Ceeway and a Bushnell EBB from Charlie the Bikemonger and got to work.

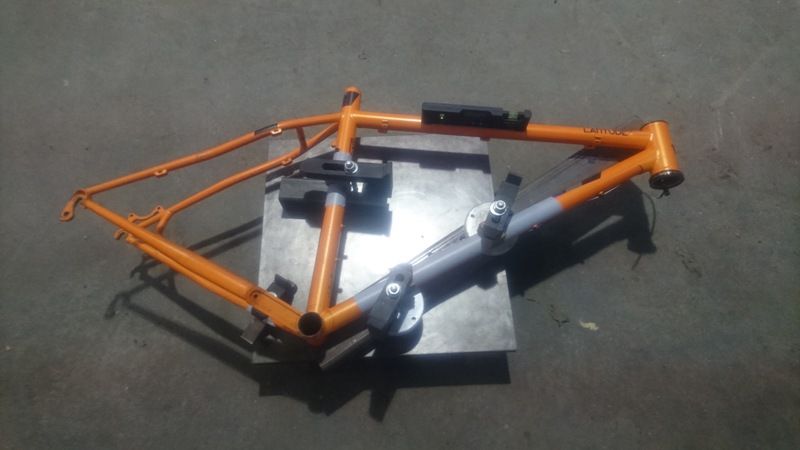
I made a jig to hold the frame parallel to the bench by measuring the size of the tubes and then selected/made spacers to suit.

Image

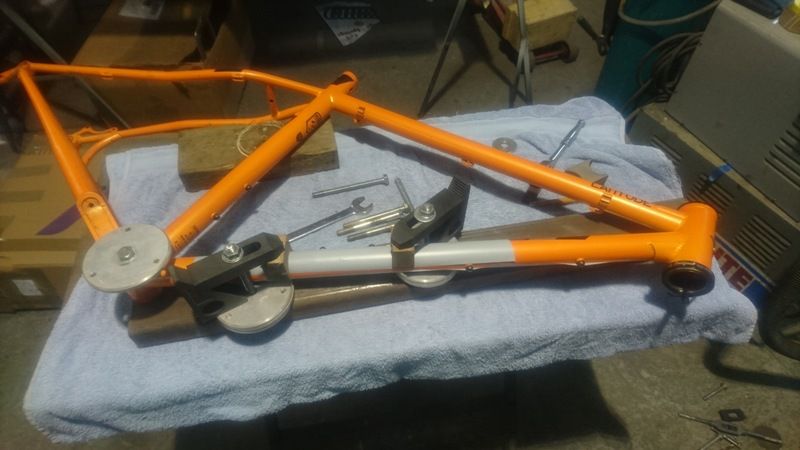
Checking the frame is set correctly on my surface plate. The jig holds the frame such that the BB is 90 degress to the main steel section on the jig.

Image

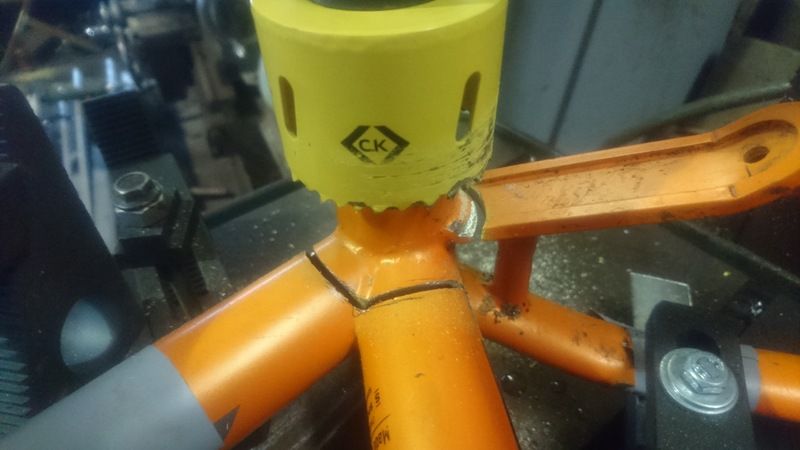
I then mounted the whole lot on the drill bed and cut out the old BB shell with a holesaw.

Image

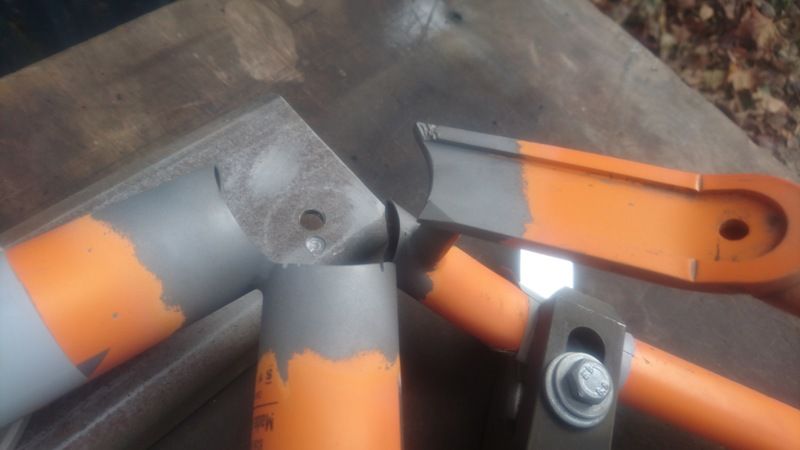
Checking the fit of the new BB shell, I had to fettle the cut on the tubes to get this to fit as I wanted. The top plate holds the BB shell in place for welding and the bottom one spaces it up as it's narrower than the threaded shell which was cut out.

Image

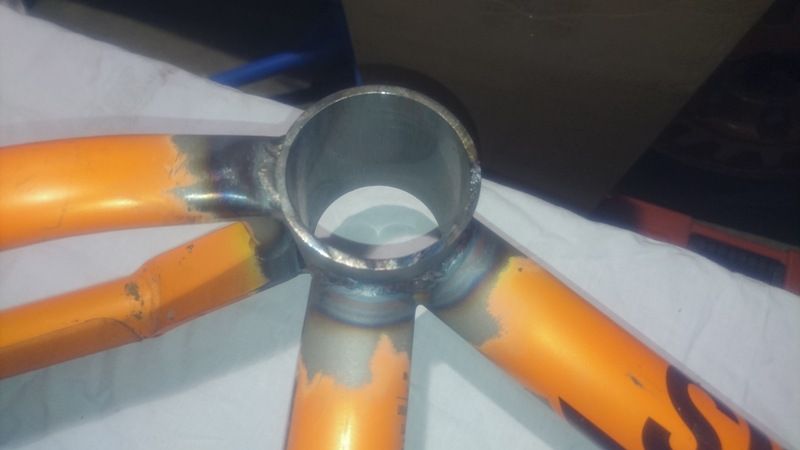
I cleaned it all up with a small shot-blasting gun to get it nice and clean for welding.

Image

I did consider welding it up myself as I have a small DC TIG but I've not used it in a few years so I'd have to get some Argon for shielding and get some practice in. I tracked down a friend of a friend who welded it up for me.

Image

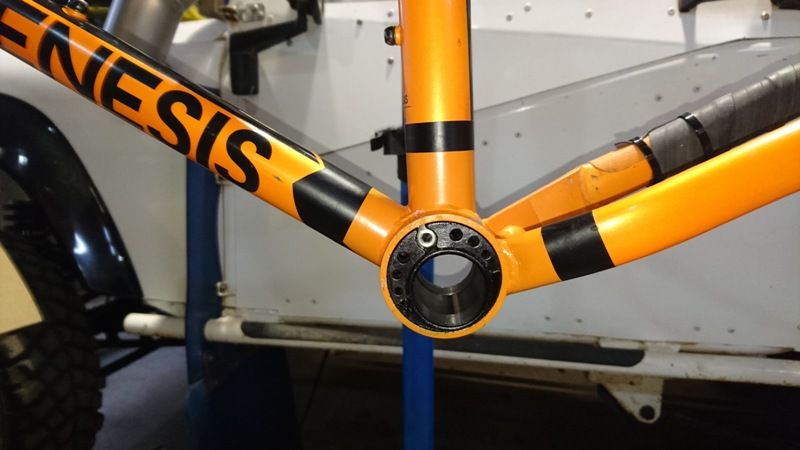
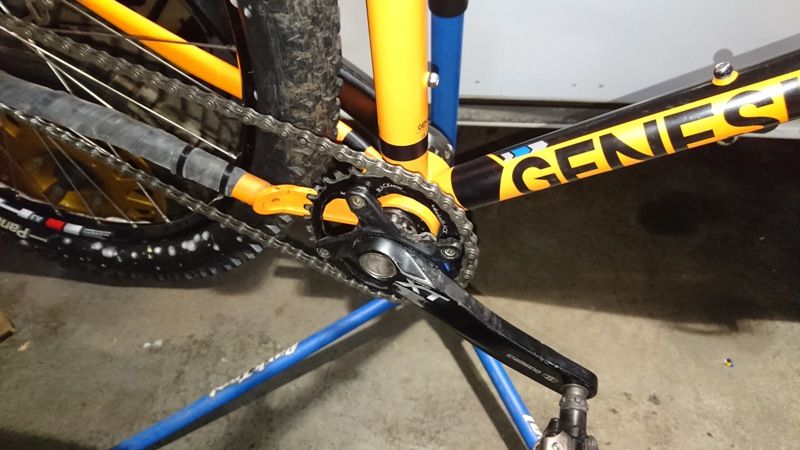
After painting the area and new BB shell I fitted the EBB. The new paint isn't the same shade as the original frame so I added some decals on the line where the colour changes to hide it. You can see the change in colour on the inside of the non-driveside chainstay but this is hidden with the wheel fitted.

Image

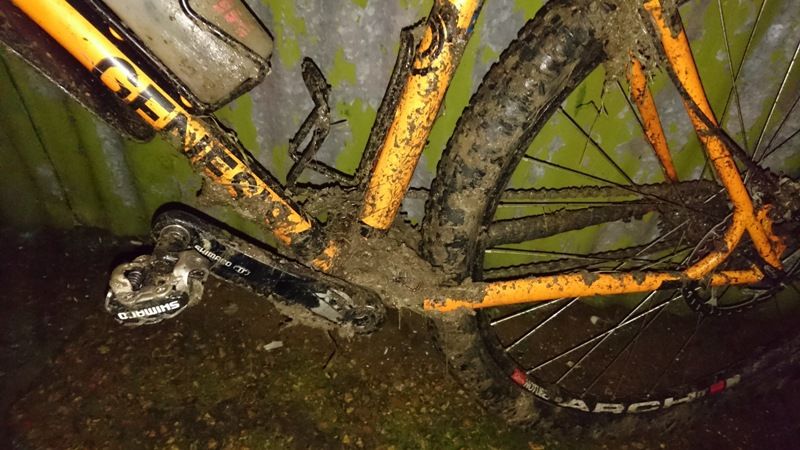
Bike back together and ready to go :grin:

Image

The worst bit of he whole job was cutting the old BB out as the holesaw didn't have enough depth of cut so I had to cut part way through, then cut out the bit of BB, then holesaw some more etc. It was also pretty nerve-racking as once I'd started cutting there was no way back if it all went wrong.

I rode it for the first time this morning, only a flat 7.5 miles to work on a cycle path but seemed to ride ok. It's a proper off road test on the way home of 25 hilly miles in the dark which also has the advantage that I won't be able to see the new paint doesn't match :lol:

Sean
Adventure without risk is Disneyland - Bikemonger
User avatar
benp1
Posts: 4054
Joined: Sat Dec 07, 2013 7:36 pm
Location: South Downs

Re: Single Speed Conversion

Post by benp1 »

Good commitment to SS there sir, good job too

Not sure I'd be brave enough to cut my frame myself...!
Ben98
Posts: 1151
Joined: Tue Apr 09, 2013 8:21 am
Location: Somewhere in the 4th dimension

Re: Single Speed Conversion

Post by Ben98 »

That takes some balls, good work!
Looks really well finished and the decals look like they were there from new.
User avatar
Bearbonesnorm
Posts: 23937
Joined: Sun Jun 05, 2011 8:53 pm
Location: my own little world

Re: Single Speed Conversion

Post by Bearbonesnorm »

Superb, good effort :cool:
May the bridges you burn light your way
User avatar
Charliecres
Posts: 1453
Joined: Tue Oct 01, 2013 1:28 pm

Re: Single Speed Conversion

Post by Charliecres »

Impressed. :-bd
User avatar
johnnystorm
Posts: 3952
Joined: Wed Nov 21, 2012 9:55 pm
Location: Eastern (Anglia) Front

Re: Single Speed Conversion

Post by johnnystorm »

Mentalist! :-bd
Image
slarge
Posts: 2646
Joined: Mon Aug 22, 2011 4:49 pm
Location: MTB mecca (Warwickshire)

Re: Single Speed Conversion

Post by slarge »

Good effort, not sure if I would go quite that far on a hack frame!
User avatar
sean_iow
Posts: 4291
Joined: Tue Sep 30, 2014 12:08 pm
Location: Isle of Wight

Re: Single Speed Conversion

Post by sean_iow »

Cheers All, I'm really pleased with how it came out.
slarge wrote:Good effort, not sure if I would go quite that far on a hack frame!
Oi! That's my pride and joy :wink:

The low cost of the original frame as an ebay bargain (it was new but has a paint defect on the seat tube, I put a sticker over that as well :lol: ) did help with the decision to try the work myself as it was not too big a loss if it all went wrong.

There were several reasons I decided to modify it in the end, apart from getting a better way to tension the chain:-

I couldn't find a replacement frame with all my required features
The bike is the most comfortable hardtail I've ridden (and the same has been said by my friends who have ridden it)
It handles really well (it's saved me on more than one occasion when I've run out of talent and the bike seems to just somehow stay upright)
I really like the look of the frame
I couldn't really afford to buy another frame
I'm quite emotionally attached to it (it's the bike I rode on my fist solo bivi and on my first off-road century)
Most importantly - I've got custom full and partial frame bags I've made for it and there is more time invested in making these than the conversion took to do

I went the long way home from work last night (22 miles with about 60% off road) and it seemed to still ride just as well as before the work :grin: When I got home I did wonder why I put in the effort to hide the transition between the old and the new paint as the trail conditions seem to be up to the task of doing that.

Image
Adventure without risk is Disneyland - Bikemonger
Fat tyre kicker
Posts: 982
Joined: Sun Jan 04, 2015 8:39 pm
Location: Cheshire

Re: Single Speed Conversion

Post by Fat tyre kicker »

Epic mod there to be fair :-bd
User avatar
fatbikephil
Posts: 6539
Joined: Wed Apr 02, 2014 10:51 pm
Location: Fife
Contact:

Re: Single Speed Conversion

Post by fatbikephil »

Nice one, got to love steel frames!
Trail-rat
Posts: 641
Joined: Wed Oct 14, 2015 1:30 pm
Location: Between Aberdeen and the Cairngorms

Re: Single Speed Conversion

Post by Trail-rat »

Good work that !
User avatar
Zippy
Posts: 3059
Joined: Mon Oct 15, 2012 6:43 pm
Location: Suffolk
Contact:

Re: Single Speed Conversion

Post by Zippy »

Top tinkering Sean. Looks very well executed.

What sorry of shot blaster did you use, and what medium were you blasting with? That's next on my list of things to get (thinking alloy refurbs)!
User avatar
sean_iow
Posts: 4291
Joined: Tue Sep 30, 2014 12:08 pm
Location: Isle of Wight

Re: Single Speed Conversion

Post by sean_iow »

My blasting gun is this one by SIP

https://www.sipuk.co.uk/sip-02150-maxi- ... 1-cfm.html

You need a fairly big compressor to keep up with it but it's ok for small areas. I used normal blasting media as it's a steel frame. I bought it in Machine Mart about 10 years ago so you can tell it doesn't get much use but on the frame it was the only way to get it cleaned up. If I did another one I'd clean the area with the wire cup brush on the grinder before cutting out the BB as then I could turn it over as it wouldn't be fixed to a length of steel box section :oops:

You'd might need softer media for alloy? but I'm no expert. I have the gun as I've used it on bits of land rover over the years. It does also make a mess and the media goes everywhere! I did the frame outside but if I was doing a larger item I'd work inside and bicycle up a tarp (not the nylon sort we sleep under) in a bath tub type shape so I could collect the media, sieve it and re-use.

If you've got a big area to do you'd probably be better off with something like this

https://www.sipuk.co.uk/sip-02157-sandb ... 1-cfm.html

But I've got no experience of using one so couldn't comment on how well they work. When I need something really big doing like a land rover chassis I just pay for it to be done at the local blasters who then prime it as well straight afterwards.
Adventure without risk is Disneyland - Bikemonger
User avatar
Zippy
Posts: 3059
Joined: Mon Oct 15, 2012 6:43 pm
Location: Suffolk
Contact:

Re: Single Speed Conversion

Post by Zippy »

Nice one - I like that sandblaster hopper kit. Shame it takes up a lot of space and that's something that is at a premium. :roll: Still 11cfm is fine, my 50Litre compressor does 12.9 according to the specs, so should be alreet. :cool: Won't be doing this till summer anyways :lol:

The neighbours must love people like us Image
User avatar
GregMay
Posts: 3811
Joined: Tue Apr 21, 2015 12:57 pm
Location: Calderdale
Contact:

Re: Single Speed Conversion

Post by GregMay »

Good work sir, that I liked.
Image
User avatar
Bearbonesnorm
Posts: 23937
Joined: Sun Jun 05, 2011 8:53 pm
Location: my own little world

Re: Single Speed Conversion

Post by Bearbonesnorm »

You'd might need softer media for alloy?
I used to use coconut husk for cylinder heads.
May the bridges you burn light your way
Post Reply